


Introduction
You’re here because you want the best tool for your needs, right? Not just something that “kind of works” but a platform that actually ticks all the boxes – without nasty surprises later. Here’s the thing: software providers love to claim they do it all. “Oh, yeah, we’ve got that feature!” they’ll say. But when it’s time to actually use the tool, suddenly that feature doesn’t work how you expected. That’s where your trusty feature table comes in. It’s not just a fancy spreadsheet – it’s your BS detector and decision-making buddy.
In this article, we’ll walk through how to set up a table that makes demo calls a breeze. You’ll assign priorities, flag deal-breakers and have a clear plan to get real answers from vendors. This is part of a series on how to pick the right platform for your needs.
Platform Pick 1: Win Stakeholder Support
Platform Pick 2: Create a Checklist
Platform Pick 3: Create a Feature Comparison Table
Platform Pick 4: Define Your Needs Clearly
Platform Pick 5: Hunt for the Right Platform
Platform Pick 6: Send Out Requests for Proposals
Platform Pick 7: Demos with Vendors
Platform Pick 8: Check Pricing and Value
Platform Pick 9: Choose Your Top Favorites
Platform Pick 10: Business, Legal, and IT Prep
Platform Pick 11: Integrate and Test it
Platform Pick 12: Rollout
Ready to get organized? Let’s dive in.
The Affiliate Platform Guide
Everything you need to choose the right affiliate platform in one place. Download the complete guide and keep it as your handy reference.

Creating the Feature Comparison Table
Let’s get down to business – building your feature comparison table. This is the backbone of your decision-making process, so it’s worth putting in the effort now to save headaches later. Think of it as your personal cheat sheet for cutting through the noise and figuring out which platform is actually worth your time.
Step 1: List the Features That Matter
Start by listing all the features you need. Focus on what’s essential for your business today and, even more importantly, what could be crucial in the future. Why? Because the wrong tool could limit or even block your growth within a year. Imagine landing a promising affiliate who requests a feature your platform doesn’t support – suddenly, that missing functionality becomes a roadblock. Make sure to capture everything – from must-haves to nice-to-haves – so your tool can grow with you, not hold you back.
Pro TIP: break down complex features into smaller, distinct parts so you can compare them easily. For instance, if you need to handle both bonuses and penalties, don’t group them together under “commission adjustment.” Some platforms might only support one of those, and you don’t want to miss that detail.
Step 2: Assign Priorities
Here’s the trick to making this table work: assign a priority level to each feature. Use a scale, like 1 to 3, where:
- 3 = Essential (you can’t live without it).
- 2 = Important (you really want it but could work around it).
- 1 = Nice-to-have (would be cool, but not a dealbreaker).
Why make the highest number the highest priority? Simple – because you’ll be calculating each platform’s total score, and the higher the score, the better the match. It’s a straightforward way to identify the strongest contenders. If there’s a feature that’s absolutely critical – like Lead Generation for the lending industry – boost its points even more. Platforms without it shouldn’t be crowding the top of your list. By prioritizing this way, you ensure only the best-fit options make it to your final selection.
Pro TIP: Keep it realistic. If everything’s marked as essential, your table won’t help you narrow down options.
Add KO Factors
Here is where it gets interesting. KO factors are your dealbreakers – things that automatically eliminate a platform from the running. These could be things like non-compliance with GDPR or a lack of support for your region. Assign negative weights to these so they stand out.
Step 3: Write Clear Descriptions for Each Feature
Now it’s time to get specific. For every feature, write a short, clear description of what it is and what it should do. Keep it simple- just enough to explain it without overloading on details. This will come in handy later when you’re putting together the request-for-quote document. Think of it as laying the groundwork for smooth communication with vendors.
Step 4: Set Up the Table
Pop all this into a spreadsheet. Create columns for the feature name, priority, and the platforms you’re considering. Leave the platform columns blank for now – you’ll fill them in during your demo calls. Your table might look something like this:
Step 5: Be Ready to Adjust
Remember, this table is a living document. As you learn more during your demo calls, you might discover new features to add or adjust priorities. That’s totally fine – it’s all part of the process.
By the end of this step, you’ll have a clear, organized way to evaluate platforms. And trust me, this table will save you from a lot of “we thought they could do that” regrets later on. Next up? How to use it during demo calls.
Prefilled Example
We’ve done the heavy lifting for you! Using our in-depth research across dozens of tools on the market and over 30 features, we’ve prefilled a feature comparison table to give you a head start. This isn’t just a random list – we’ve carefully analyzed all platforms on the market and included the features that matter most.
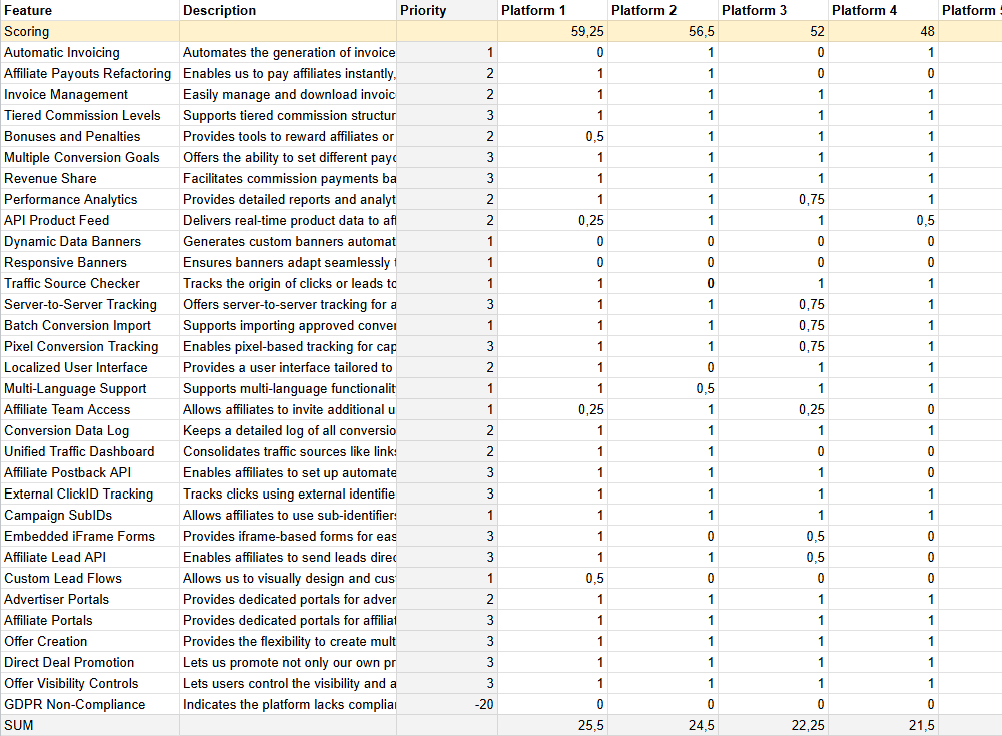
This example showcases how to organize your features, assign priorities, and use weights effectively to evaluate platforms. It’s a great reference to guide your own table setup and customization.
How to Use It
- Open the Example Table: Click here to access the prefilled Google Sheet. Make a copy so you can edit and adapt it to your needs.
- Review the Structure: Familiarize yourself with the categories and scoring system.
- Customize: Replace the example features with your own and adjust weights as necessary.
Populating the Table
You’ve got the table set up – now it’s time to put it to work. This tool is your secret weapon for cutting through the noise and finding the right affiliate platform. Customize it, fill it with real data, and let it guide your decision.
Where to next
Explore Our Guide to Choosing the Best Affiliate Platform
-

Platform Pick: How to choose the right Affiliate Platform
Real guidance from consultants who’ve helped dozens of companies choose the right affiliate platform.
-
Platform Pick 1: Win Stakeholder Support
Discover how to grow your affiliate program, drive better results, and get stakeholders onboard for a new platform that boosts your affiliate channel
-

Platform Pick 2: Create a Checklist
Learn how to break down your affiliate platform integration into manageable tasks with our checklist, keeping track of progress and staying on schedule.
-

Platform Pick 3: Create a Feature Comparison Table
Learn how to create a feature comparison table for affiliate platform selection. Prioritize, add KO factors, and use our prefilled example to get started!
-

Platform Pick 4: Defining Your Needs Clearly
Learn how to clearly define your business and needs for an affiliate platform. Use our guide to create a clear, detailed document for vendor discussions.
-
Platform Pick 5: Hunt for the Right Platform
Learn how to build a longlist of potential affiliate platforms. Use our guide to gather, filter, and organize options for your platform search.
-

Platform Pick 6: Send Out Requests for Proposals
Learn how to craft the perfect outreach email to vendors. Set expectations, request demos, and keep things organized for a smooth platform selection process.
-

Platform Pick 7: Demos with Vendors
Get the most out of vendor demos with this guide! Learn how to schedule, prepare, and evaluate platforms to find the perfect match for your needs.
-
Platform Pick 8: Check Pricing and Value
Learn how to evaluate pricing and value for affiliate platforms to make sure you're getting the best deal for your business now and in the future.
-

Platform Pick 9: Choose Your Top Favorites
Learn how to narrow down affiliate platforms by evaluating features, pricing, and scalability to choose the right fit for your business.
-

Platform Pick 10: Business, Legal, and IT Prep
Ensure your top affiliate platform meets business, legal, and technical needs by getting expert feedback and aligning with your teams before moving forward.
-

Platform Pick 11: Integrate and Test it
Learn how to track affiliate clicks and leads accurately, handle cookie consent, and ensure proper attribution for smooth affiliate marketing success.
-

Platform Pick 12: Rollout
Ensure a smooth affiliate platform rollout by reviewing tasks, coordinating teams, and monitoring post-launch performance for a seamless experience.