Connection Creator is not only for delivering leads. It also handles what happens to a conversion after the lead was delivered: confirming it, updating it, or deciding what it is worth.
There are two directions, and the difference is who makes the call.
- S2S postback : the advertiser calls PalDock.
- Tracking API : PalDock calls out.
Both use the same editor. This page is about what you build inside it. When each one fires, and how an incoming S2S postback is matched to a lead, is covered on those two pages.
S2S postback
The scenario runs when an advertiser reports the outcome of a conversion: approved or rejected, the sale value, the approved loan amount.
The simple case needs no scenario at all. The postback is received and stored on its own. You only build a flow when something more has to happen.
The useful case is branching on what arrived. Send another request when the postback comes in incomplete, or work out the commission from a value the advertiser reported.
One thing to set up first: if a postback has any steps configured, the advertiser must send a Postback ID with the call. Without it the postback is still received, but your flow never runs.
Example: commission tiers based on the loan amount
The advertiser sends {value}, the approved principal. The scenario reads it and sets {commission}:
{value}under 500 : commission 10 USD{value}from 500 to 800 : commission 17 USD{value}800 and above : commission 23 USD
In the editor:
- One Start node
- Several connections leaving it, each with a condition comparing
{value}against a threshold, using is less than, is greater than or equals and so on. See Connections with Conditions. - One Set node per branch, writing the amount into
{commission}.
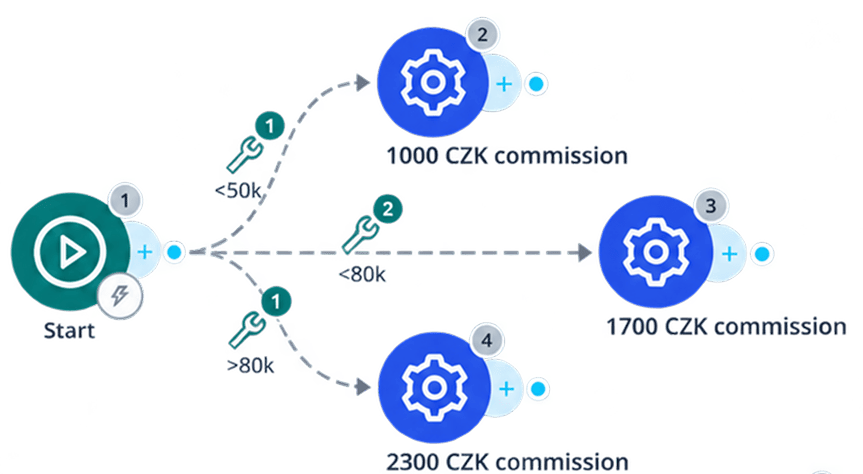
The pattern to remember: conditions live on the connections leaving the Start node, and every branch ends in a Set node that writes the final value.
Building on top of it
Once {commission} is set, you can reference it in a commission formula, for example {commission}+10 for a VIP group.
The base logic then lives in one scenario, and specific partner groups get an uplift on top without duplicating it. See Commission amount.
Tracking API
Here PalDock decides when to call. Nothing is arriving, so the scenario controls when to check, how often to try again, and when to give up.
Polling for a result
The most common use. Ask the advertiser’s API what happened to a lead, and once it reaches a final state, update the transaction and read the value or commission out of the response.
The usual shape:
- Start node
- Wait node, for example 12 hours, to give the advertiser time to process the lead before the first check.
- Modify Field node if the request needs authentication built first, such as Base64-encoding credentials for a Basic auth header.
- HTTP node, a GET to the advertiser’s status endpoint, using the advertiser’s own ID for the lead.
- Conditions on the connections leaving the HTTP node, matching the status field in the response:
- A final rejected state : Set node writing
{result}= rejected, then End. - A final approved state : Set node writing
{result}= approved, and optionally{commission}straight from the response, then End. - Anything else, meaning still pending : into the retry loop.
- A final rejected state : Set node writing
- The retry loop is a Breaker node plus a Wait node, looping back into the same HTTP node. The Breaker caps how many times it may repeat, for example six.
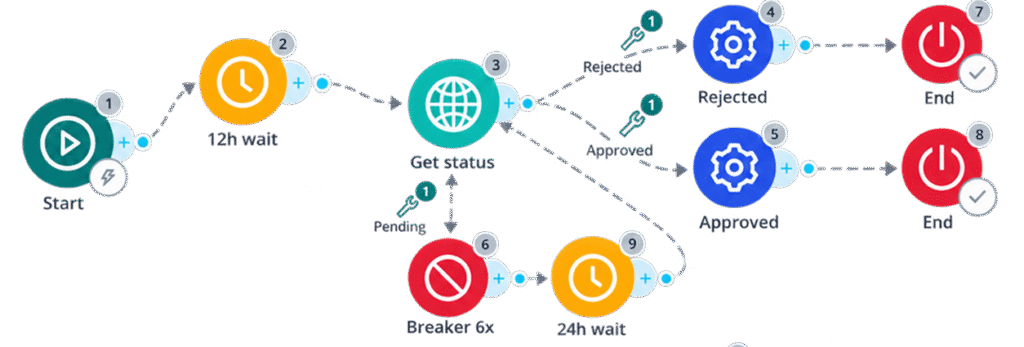
Match the pending branch with does not match against the known final states, rather than listing every pending state the advertiser might invent. New states then land in the retry loop instead of being ignored.
When the Breaker limit is reached, the flow stops without a final state. Nothing is written and nothing is retried. Those leads end up neither approved nor rejected, so decide separately what to do with them. Set the wait and the repetition count so the total window covers how long the advertiser realistically takes.
Wait, check, branch, retry with a cap. That is the backbone of almost every polling integration.
Sending data to a partner
The same mechanism in reverse: pushing data out to a specific advertiser or partner. From their side it looks like a postback arriving. From yours it is still a Tracking API, because PalDock decides when to call and what to send.
Affiliates can create their own Tracking API postback. They become its owner and see it in their administration, and only their own data is ever sent to it. That restriction is locked and they cannot change it.
As an admin you can also create a postback and assign an owner to it. The owner then sees it in their administration, exactly as if they had made it themselves. The difference is that you are not bound by the same restriction: you can assign an affiliate as the owner and still send them data covering everyone, not only their own.
Sending data to ad systems
The same again, for forwarding conversions and events into advertising platforms. It can be set globally for the whole workspace, or scoped to individual accounts or campaigns.
Both use the same conditions as everywhere else in PalDock, such as matching on result or comparing a value.